
Capture Leads via Web-to-Lead Forms
Purpose: Automatically capture leads from your website.
Steps:
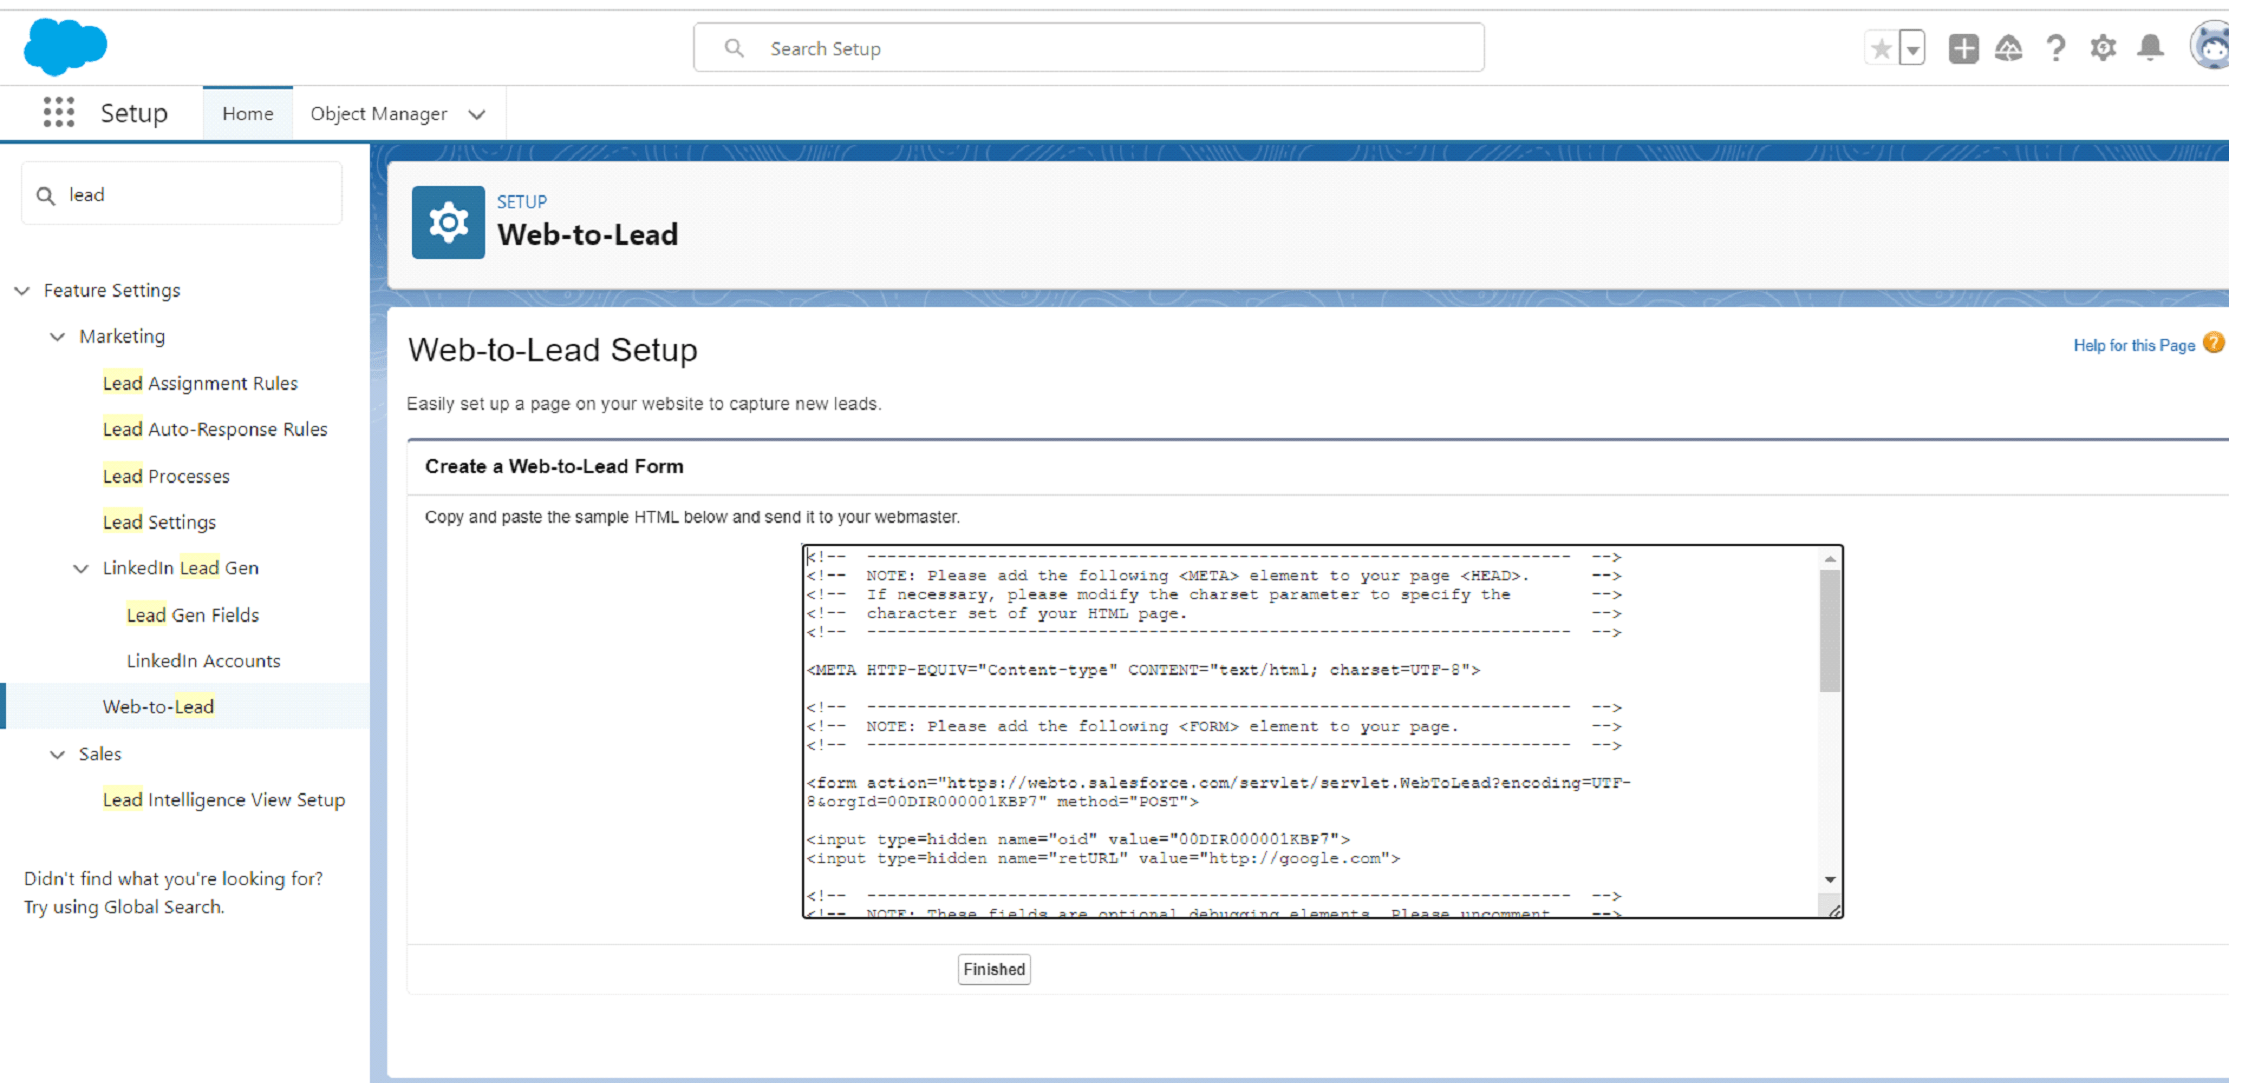
- Create a Web-to-Lead Form:
- Go to Setup.
- Search for Web-to-Lead.
- Click Web-to-Lead under Marketing settings.
- Ensure that Web-to-Lead is enabled.
- Click Create Web-to-Lead Form.
- Integrating Google reCAPTCHA with Salesforce’s Web-to-Lead Form:To prevent spam submissions and ensure that the leads captured are from real users, you need to manually implement reCAPTCHA, as Salesforce’s native Web-to-Lead form doesn’t directly support it.
Steps to set up reCAPTCHA for a Web-to-Lead form in Salesforce:
- Sign Up for Google reCAPTCHA:Purpose: Obtain the necessary keys (Site Key and Secret Key) from Google to use reCAPTCHA on your form.
- Visit the Google reCAPTCHA website.
- Click on the Admin Console.
- Log in with your Google account.
- Register your website:
- Label: Enter a name for your site (e.g., “My Salesforce Form”).
- reCAPTCHA Type: Choose reCAPTCHA v2 (“I’m not a robot” checkbox) or v3 depending on your preference.
- Domains: Enter the domain(s) where your Web-to-Lead form will be hosted.
- Accept the reCAPTCHA Terms of Service.
- Click Submit.
- Copy the Site Key and Secret Key provided. You’ll need these later.
- Sign Up for Google reCAPTCHA:Purpose: Obtain the necessary keys (Site Key and Secret Key) from Google to use reCAPTCHA on your form.
- Select the fields you want to include on the form (e.g., Name, Email, Company, etc.).

- Generate the HTML code for the form.

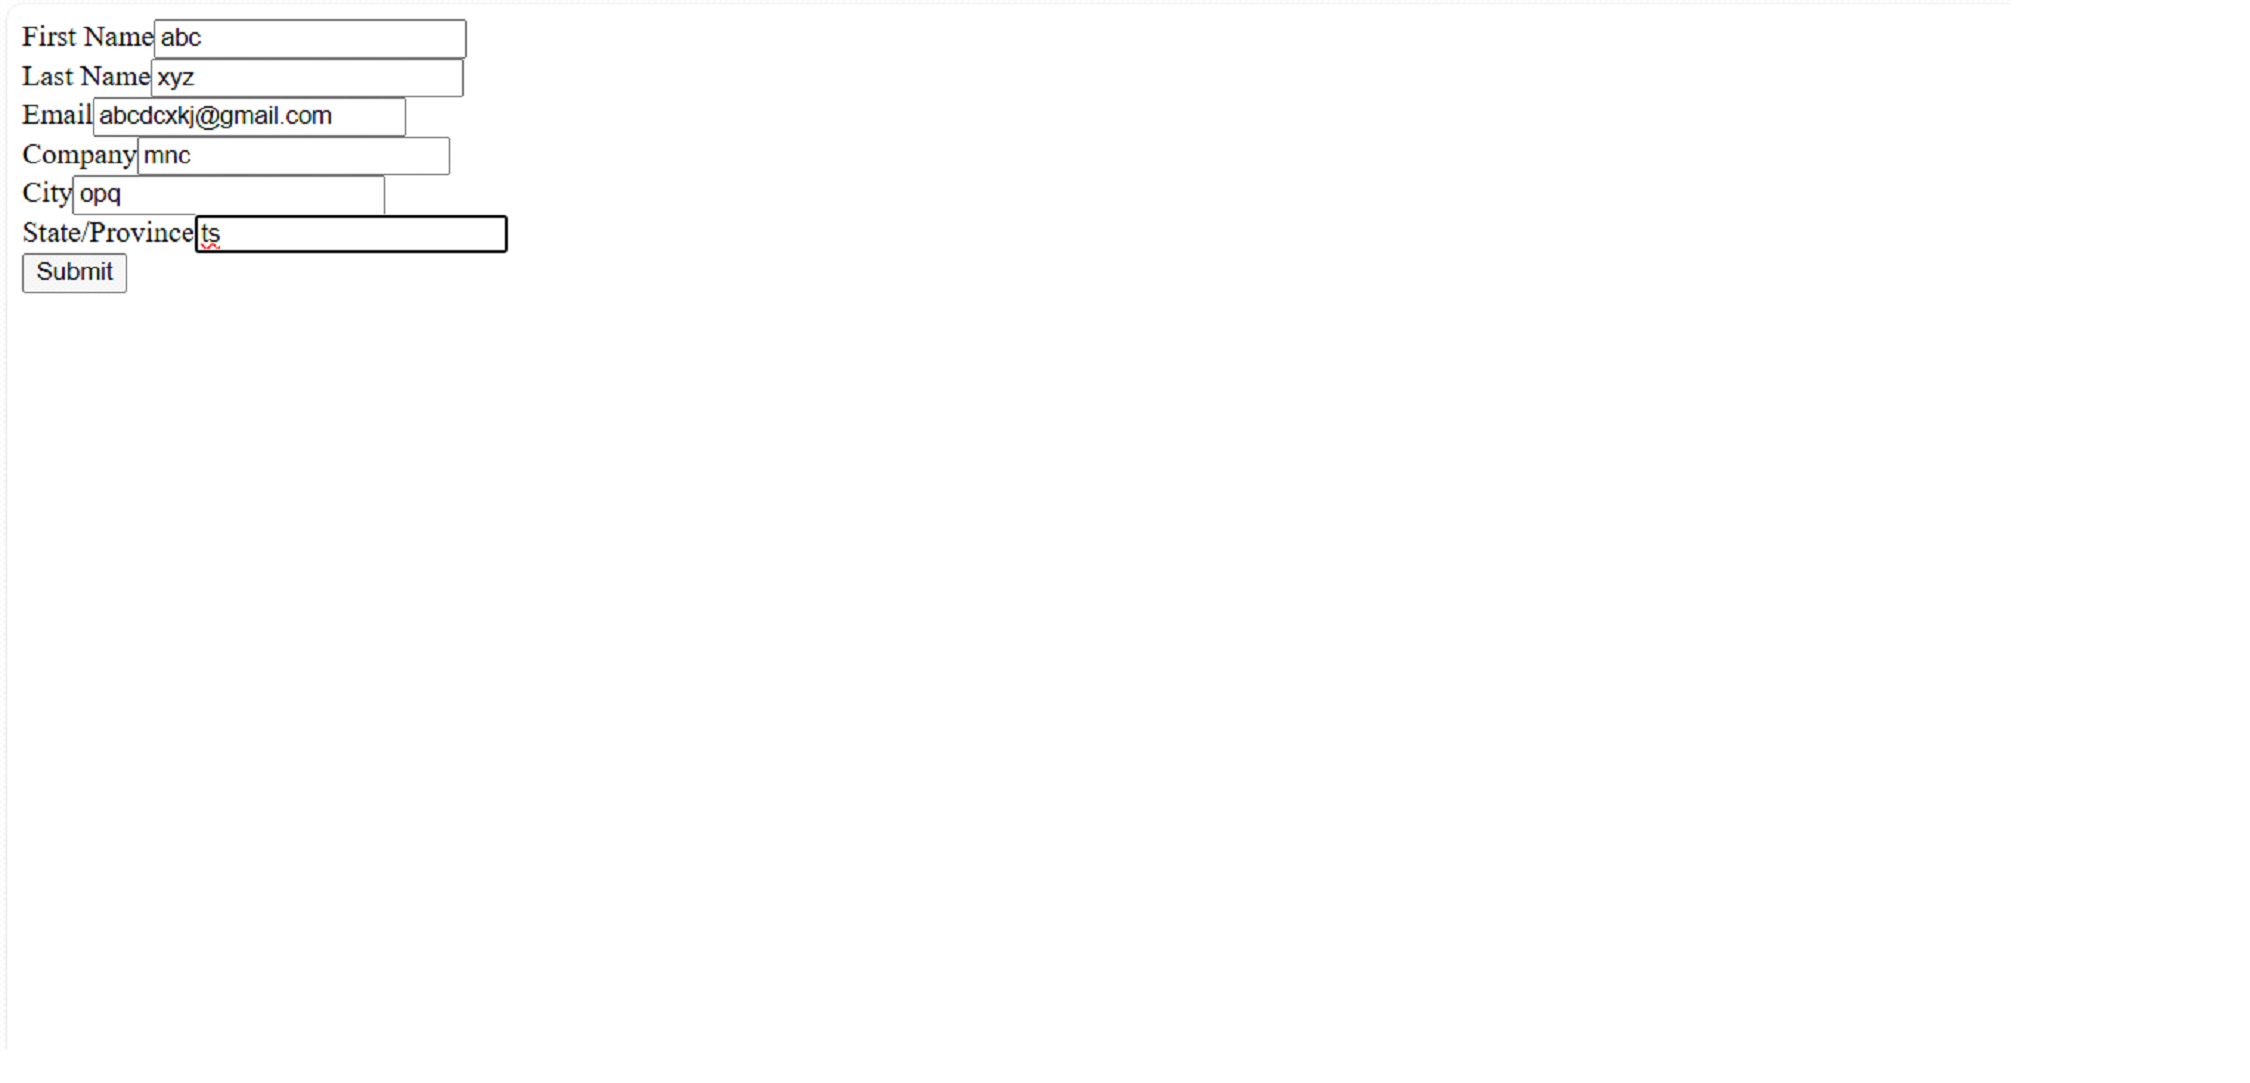
- Embed the Form on Your Website: Paste the generated HTML code into your website’s code where you want the form to appear. Here i had paste my code in notepad and save it as .html file, after this i can open the file, then i was getting like this:
After click on submit button, redirect into google web page because i was given google.com in the url box while creating web to lead form. - Test the Form:Submit a test entry to ensure the lead is captured correctly in Salesforce.
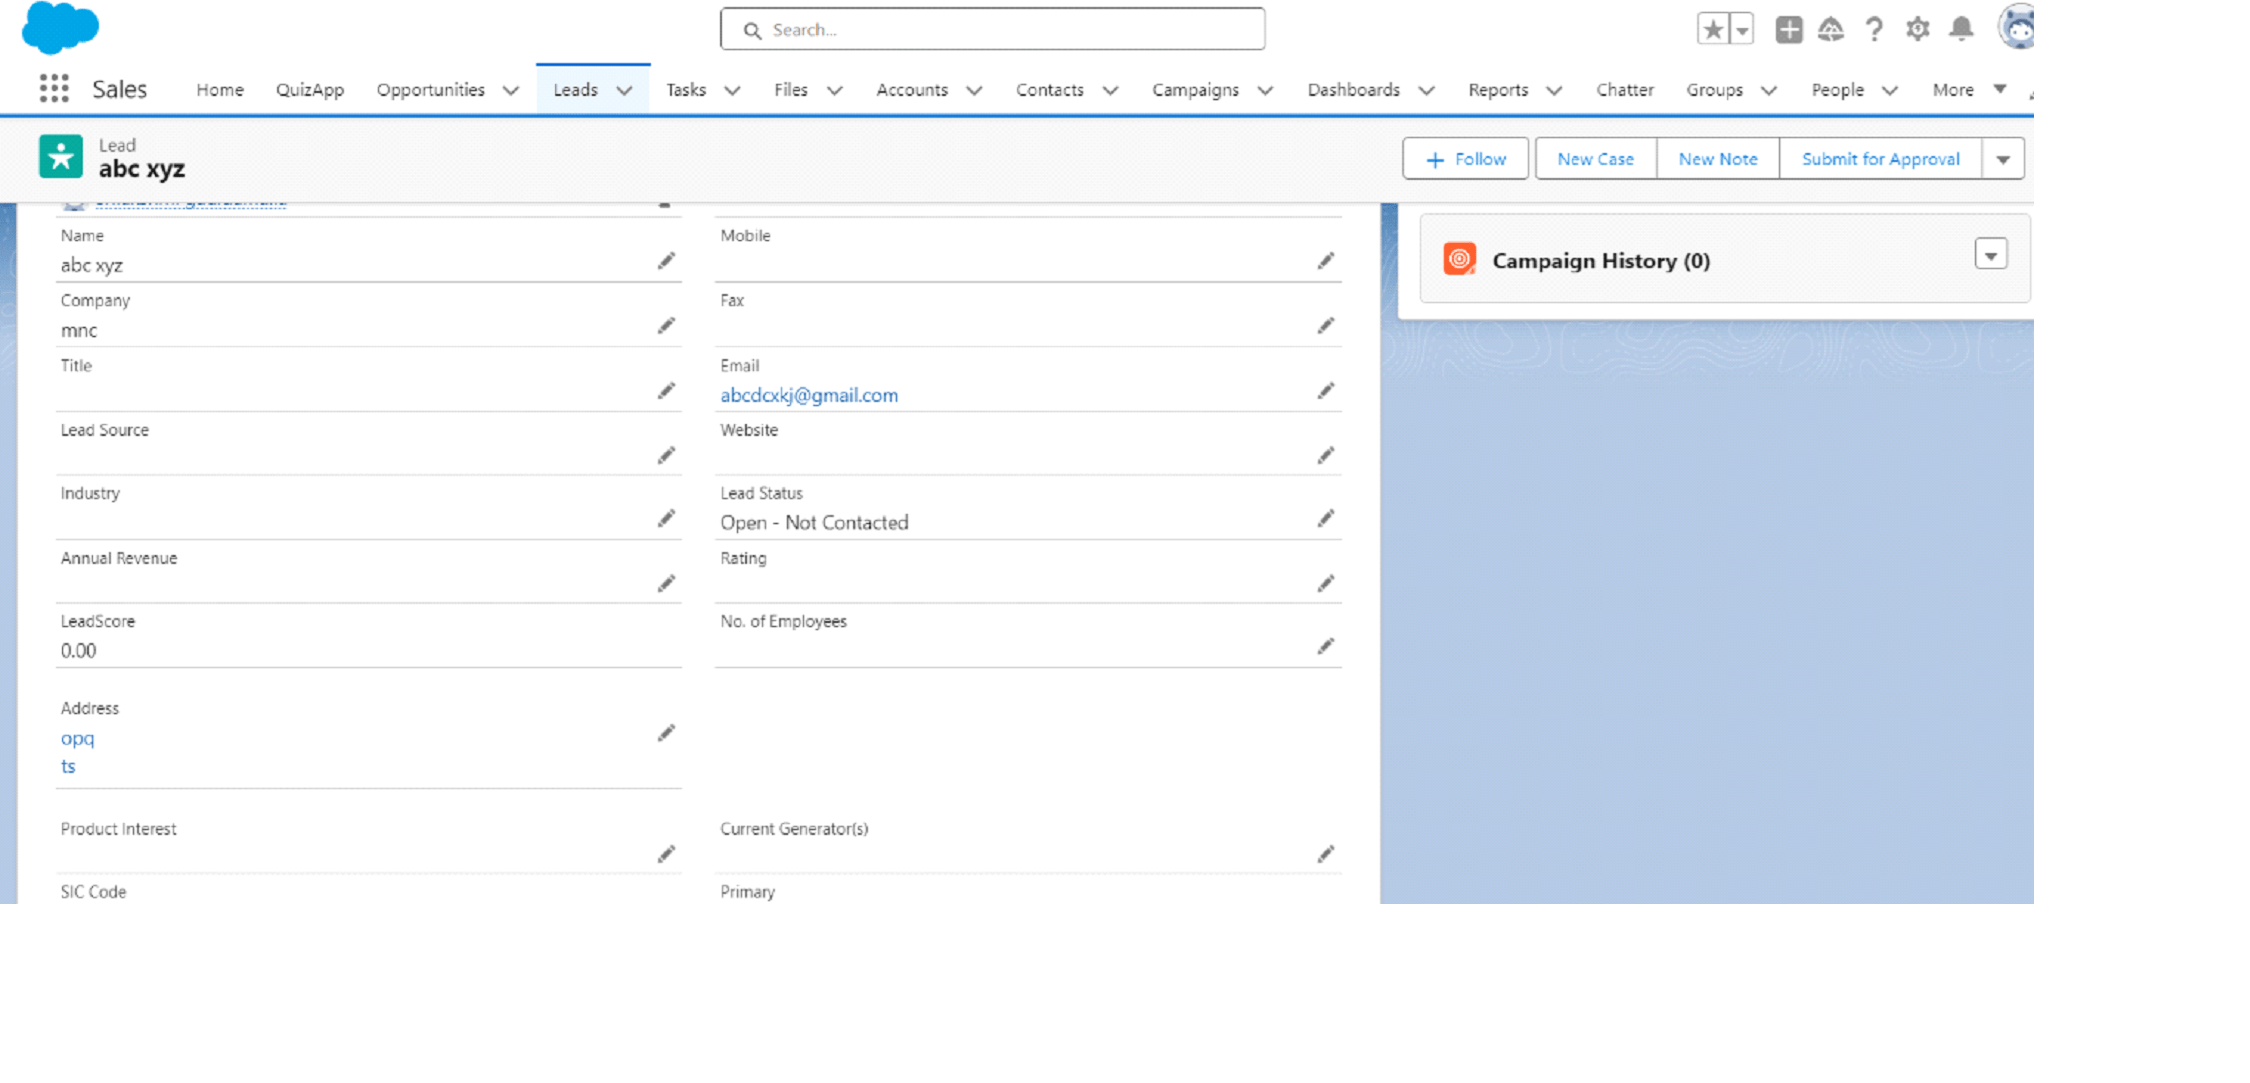
now open sales cloud through app launcher in salesforce, go to leads check the new lead was generated or not.
Open Salesforce Sales Cloud through the app launcher, go to Leads, and check if the new lead was generated.

Considerations for Creating a Web-to-Lead Form
When creating a Web-to-Lead form in Salesforce, consider the following to ensure the form is effective, secure, and compliant with best practices:
1. Field Selection
- Relevance: Only include fields that are necessary for capturing essential lead information (e.g., Name, Email, Company). Avoid overwhelming users with too many fields.
- Required Fields: Make sure to select the fields that are required for your lead process. Salesforce will automatically include required fields like Last Name and Company.
- Custom Fields: If you need additional information that isn’t captured by standard fields, create custom fields in Salesforce and add them to the form.
2. Form Design
- User Experience: Design the form to be user-friendly, with a clean and simple layout. Minimize the number of fields to encourage more submissions.
- Responsive Design: Ensure that the form is mobile-friendly and responsive so it looks good on all devices.
- Form Validation: Implement client-side validation to ensure that users enter valid data (e.g., proper email format).
3. Spam Prevention
- CAPTCHA: Consider integrating CAPTCHA to prevent spam submissions from bots. Use third-party services or custom code to add it.
- Honeypot Fields: Use hidden honeypot fields to trap bots without impacting user experience.
4. Data Privacy and Compliance
- GDPR/CCPA Compliance: Include checkboxes for consent and provide a link to your privacy policy if you operate in regions subject to data protection regulations.
- Data Encryption: Ensure that data transmitted through the form is encrypted (using HTTPS).
- Privacy Policy Link: Include a link to your company’s privacy policy on the form.
5. Lead Assignment and Routing
- Default Lead Owner: Set a default lead owner in Salesforce for any leads submitted through the form.
- Lead Assignment Rules: Ensure specific rules for routing leads are set up and active in Salesforce to route the captured leads appropriately.
6. Thank You Page/Redirect URL
- Thank You Page: After the form is submitted, redirect users to a “Thank You” page.
- Tracking: Use the Thank You page to track conversions and integrate with your analytics tools.
7. Notifications and Auto-Responses
- Auto-Response Email: Configure an auto-response email in Salesforce to acknowledge receipt of the lead.
- Notifications to Sales Team: Set up email alerts or tasks in Salesforce to notify the sales team when a new lead is captured.
8. Form Placement and Integration
- Website Placement: Ensure the form is placed prominently on high-traffic pages of your website.
- Integration with CMS: If using a CMS like WordPress, ensure the form integrates seamlessly.
9. Security Considerations
- Prevent Cross-Site Scripting (XSS): Protect the form against common security vulnerabilities like XSS.
- Salesforce Domain: Use your company’s Salesforce domain for the form action URL.
10. Testing and Monitoring
- Form Testing: Thoroughly test the form before deploying it live.
- Error Handling: Implement error handling to provide users with clear feedback if the form submission fails.
- Monitoring: Monitor the form’s performance and lead capture rates once live.
11. Form Limitations
- Daily Limit: Be aware that Salesforce imposes a daily limit of 500 leads that can be captured through Web-to-Lead. If you expect higher volumes, consider other methods such as the Salesforce API for capturing leads.
- Character Limits: Some fields have character limits. Ensure your form fields comply with these limits.
By considering these factors when creating a Web-to-Lead form in Salesforce, you can ensure that your form is effective in capturing quality leads, secure, compliant with regulations, and optimized for user experience.